adamiamelia

my babies

Tuesday, February 26, 2013

Homemade baby cloth wipes

I'm 5 and a half months pregnant now and at what you might call a baby-moon stage where I'm somewhat more productive, feel healthy and am probably at the nesting stage too considering I'm slightly more organised than I usually am. Great time to be making something for the baby today, I thought. We have decided to fully cloth-diaper this time. With Adam and Mia, we only partially cloth diaper and didn't have enough CDs for fulltime. This time insyaAllah I am determined to cloth diaper Baby no 3 fulltime. Both my babies are fully toilet trained for a long while now so I have no ideas yet on the latest reliable brands of CD or how to cloth diaper a newborn, so if you have any tips, please leave a comment! I'd really appreciate it.


Anyway, I was thinking about CDs today and went digging in my sewing room to find anything I could use to make some CDs, maybe. I found this 2meters length of blue cotton flannel. I bought this at Adam's request a couple years ago when I was sewing a bed set for his birthday. He specifically asked for this fabric, 'to make into my selimut', were his exact words, which I thought at the time was pretty smart for a 3 year old because flannel does make great blankets. However I ended up sewing a quilt cover instead for him using another fabric, so this flannel has been sitting in my shelves ever since. I thought it would totally make lovely absorbent baby cloth wipes.


I set out to make full use of every inch of this 2 meters flannel. Afterall you can never have too many wipes, can you, especially with newborns. They pee and poop ALL THE TIME.

If you want to make these wipes too, basically what you need to do is just fold up the fabric to find the approximate size that you think might be good for wipes.You don't need a ruler at all. Fold up, look at it, put your hand on it to see if it'll cover your whole hand as you wipe and go by instinct. Then cut. They don't have to be exactly the same sizes either.


I ended up with about 24 pieces of smaller sized wipes which will be perfect for wiping bums and 16 medium sized wipes which can  I thought might be nice as burp or vomit cloths too.


Then all I had to do was serge the edges, and in less than an hour (from cutting to sewing), I was done! 40 wipes in total from 2 meters of fabric. Awesome. I know these will be so useful when the baby comes.

Adam made 4 of these for me and they look just as perfect as mine. He's not new to sewing. After watching me sew for practically the whole 5 years of his life, he has made his own pants, his own apron, some small toys for himself and even little gifts for Mia.


Recently he made these pink pillows for Mia's dollies. His idea and work from start to finish.

Back to the wipes, they would be a great first project for your child if they want to learn sewing and you own a serger.

I think I remember the flannel fabric being quite cheap when I bought it. Maybe I'll visit Nagoya again and buy some more plain flannels in other colours. More wipes in other colours and also, I'm thinking they'll probably make good absorbent kitchen wipes and swaddling blankets for Baby3. This was a very easy project and gives instant gratification. Try it!

Wednesday, February 20, 2013

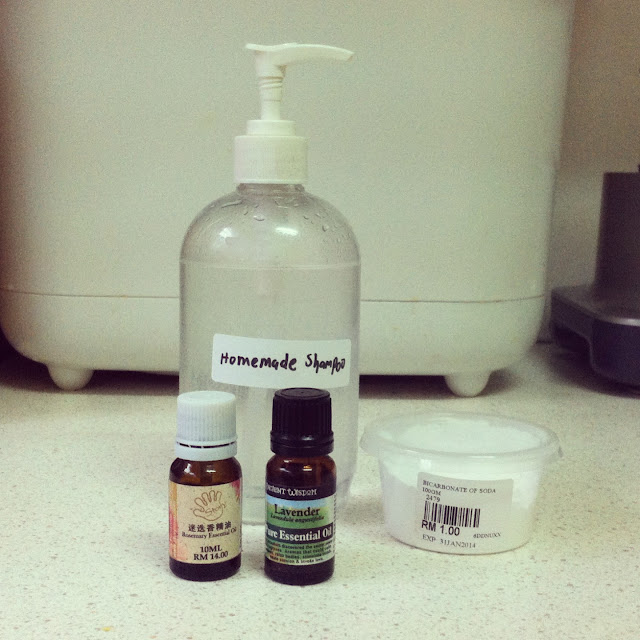
Homemade shampoo

If you read my blog a few years ago, you would realise that this is not something new for me. I tried simple homemade shampoo using only baking soda before. But shamefully, I turned back to regular shampoo after a while. It was difficult to get used to the no suds and no smell shampoo, my hair felt dry at times and I couldn't find a solution for dandruff.

This time I am determined to try again. 


The recipe is simple - a tablespoon of baking soda to a cup of water. This time I added a few drops of lavender and rosemary essential oils for the lovely smell and these oils help with scalp care and dandruff too. I'm finding it so much better than just baking soda. The rosemary gives it a kind of tingly and refreshing feeling while washing.


To help with dryness I also deep-condition my hair once or twice a week with virgin coconut oil. I love   virgin coconut oil! such a gorgeous smell and so good for hair, skin and for ingestion too. To use VCO for hair I just mix about 5 drops of lavender essential oil to about 1 oz of VCO then use about half a teaspoon each treatment. Sometimes I use VCO on it's own, no lavender. Basically I just massage the oil into the scalp and hair just before bedtime then go to bed. I wash my hair in the morning. Wake up to naturally beautiful luscious shiny hair!

So far I am loving the new homemade hair routine. If you try this remember to give a few weeks time for your hair to adjust and detoxify. It might feel slightly oily in the beginning. Our hair is used to the SLS and other toxins in our regular shampoo - break up might look ugly at first, literally! Give it time and you can have beautiful healthy locks free of chemicals.

 I have plans for other haircare treats so watch this space!

As you can see the last few posts have been about natural bodycare. I'm in the zone and if you're not a fan I hope you'll forgive me :)

I've done a lot of experimenting recently..


Playing with lip balm colours - all natural colours. In the above picture I used red clay, roselle and purple gromwell in different strength and combinations.


above : experimenting with different shea butter textures and recipes

Wednesday, February 6, 2013

of lotion bars and body butter

After the successful makings of the lip balm in the previous post, I made plans to replace yet another bodycare product we use on a regular basis - lotions and moisturisers. 


First I made body butter. This is the texture of the lotion before it was whipped...


Then it became butter!!


Gorgeous luscious smelling body butter! but unfortunately after testing this butter for a while, I don't think it'll work. after sometime the texture breaks down to a thin whip cream consistency, and down to oily...this country is just too hot for body butters with no artificial stabilisers or preservatives..or maybe I need to figure out a natural alternative to stabilise the butter texture. Which means more experimenting..which I don't think I mind all that much :) In any case this batch of melting body butter is still very nutritious for the skin so I use it at night on my foot for a moisturising foot rub, and now my dry cracked heels are healing! (I know because I only apply to one foot to compare! haha )


The lotion bars however turned out great! Looks beautiful too. They smell lovely - lavender and ylang-ylang. I place ours on a small clay pot ( but I imagine it'll look good on a pretty soap dish too ) and use it daily after bath and before bedtime. The ingredients are all natural and suitable for children, and the kids love the night-time massage. To apply we just rub it with our hands to melt a small amount of lotion and then just massage onto skin.

Goodbye you chemical-full creams!

And now I'm off to figure out what I should be making next..  :)

LinkWithin

Related Posts with Thumbnails
Message Non-Alert Script: